A Scalable Approach to Localization for Flutter
In this blog post, I will outline certain techniques that I found helpful for localizing Flutter apps. To provide some context: I am a software engineer at The Routing Company, a startup that partners with cities to build smart, sustainable transit solutions. We needed to localize our mobile apps to support deployments in countries outside of the United States, where English is not the primary language.
Initially, the process to localize your apps can be both daunting and confusing. Many of the existing packages for this task require a lot of time to setup and certainly do not come with any UI tools for updating translations, especially in real-time. What some engineers fail to realize is that the process of localizing your apps does not stop after translating all of the text on your apps. You will most likely need to support new locales and translations as you add new features and expand your customer base across different regions. Unless your engineering team is multi-lingual, you will also need to utilize professional translation services. Having multiple engineers, product managers, and translators downloading and editing one or several files is certainly not scalable when you have over a hundred strings and ten locales. When localizing your apps, it is important to think about the future.
One of the important steps towards providing a scalable localization approach is supporting real-time updates. A world where your team needs to release new app updates whenever you modify existing translations and add new locales hardly seems efficient or a good use of an engineer’s time. Surprisingly, there are not many out of the box solutions in Flutter that support real-time updates. The most standard localization package, flutter_localizations, requires developers to store their translations locally on their apps in addition to writing a lot of boilerplate code and following a tedious setup process. Fortunately, most of the other localization packages on Flutter are wrappers around this package, so the setup time has diminished significantly.
One way to support real-time updates of translations is to store your translations on a cloud storage provider and retrieve them via a HTTP request. The only localization package in Flutter I could find that has the ability to do this seamlessly was easy_localization, which also requires you to install the easy_localization_loader package. You can add the plugin dependencies to your pubspec.yaml file and the run the packages get command.
dependencies
   easy_localization: ^2.3.3
   easy_localization_loader: ^0.0.2
In the main method of your app, add the following code, replacing any placeholders with appropriate values.
runApp(
   EasyLocalization(
      child: <child widget>,
      supportedLocales: <list of supported locales>,
      path: <link to public JSON file>,
      fallbackLocale: Locale('en'),
      assetLoader: HttpAssetLoader,
   ),
);
For the path parameter of the EasyLocalization method, you should specify a link to a public JSON file that contains your translations. Below you can find an example of how this file could be structured when you have two locales — English and Catalan:
{
   "hello_en": "Good morning!",
   "hello_ca": "Bon dia!",
   "signIn_en": "Sign in",
   "signIn_ca": "ingressar"
}
The package easy_localization requires you to declare unique keys which map to translations, so that you can reference a specific translation in your app by appending the method .tr() after a translation key. Please see the documentation for easy_localization for an example. There is also more setup required than what I have described above. In order to differentiate between locales, I appended each supported locale to the end of the translation keys.
This one file will contain your translations for every locale that your app supports. Therefore, once you add 300 strings and support ten locales, this file will contain 3,000 translation keys. Managing this file could quickly become a nightmare. If you were to accidentally modify or delete a translation key, your app would be referencing a key that is not contained in the JSON file loaded by your app. This can become an issue since your app will reload the translations every time it is restarted by a user. Despite this, the package easy_localization will not cause your app to crash. Instead, it will log an error to the debug console and return the translation key instead of the actual translation. This is both a blessing and a curse, since these errors are not detected by your editor and can be very difficult to find if you are not testing your app rigorously and the last thing you want is for one of your users to tell you about a translation bug. Imagine a user seeing “hello_en” instead of “Good morning!”
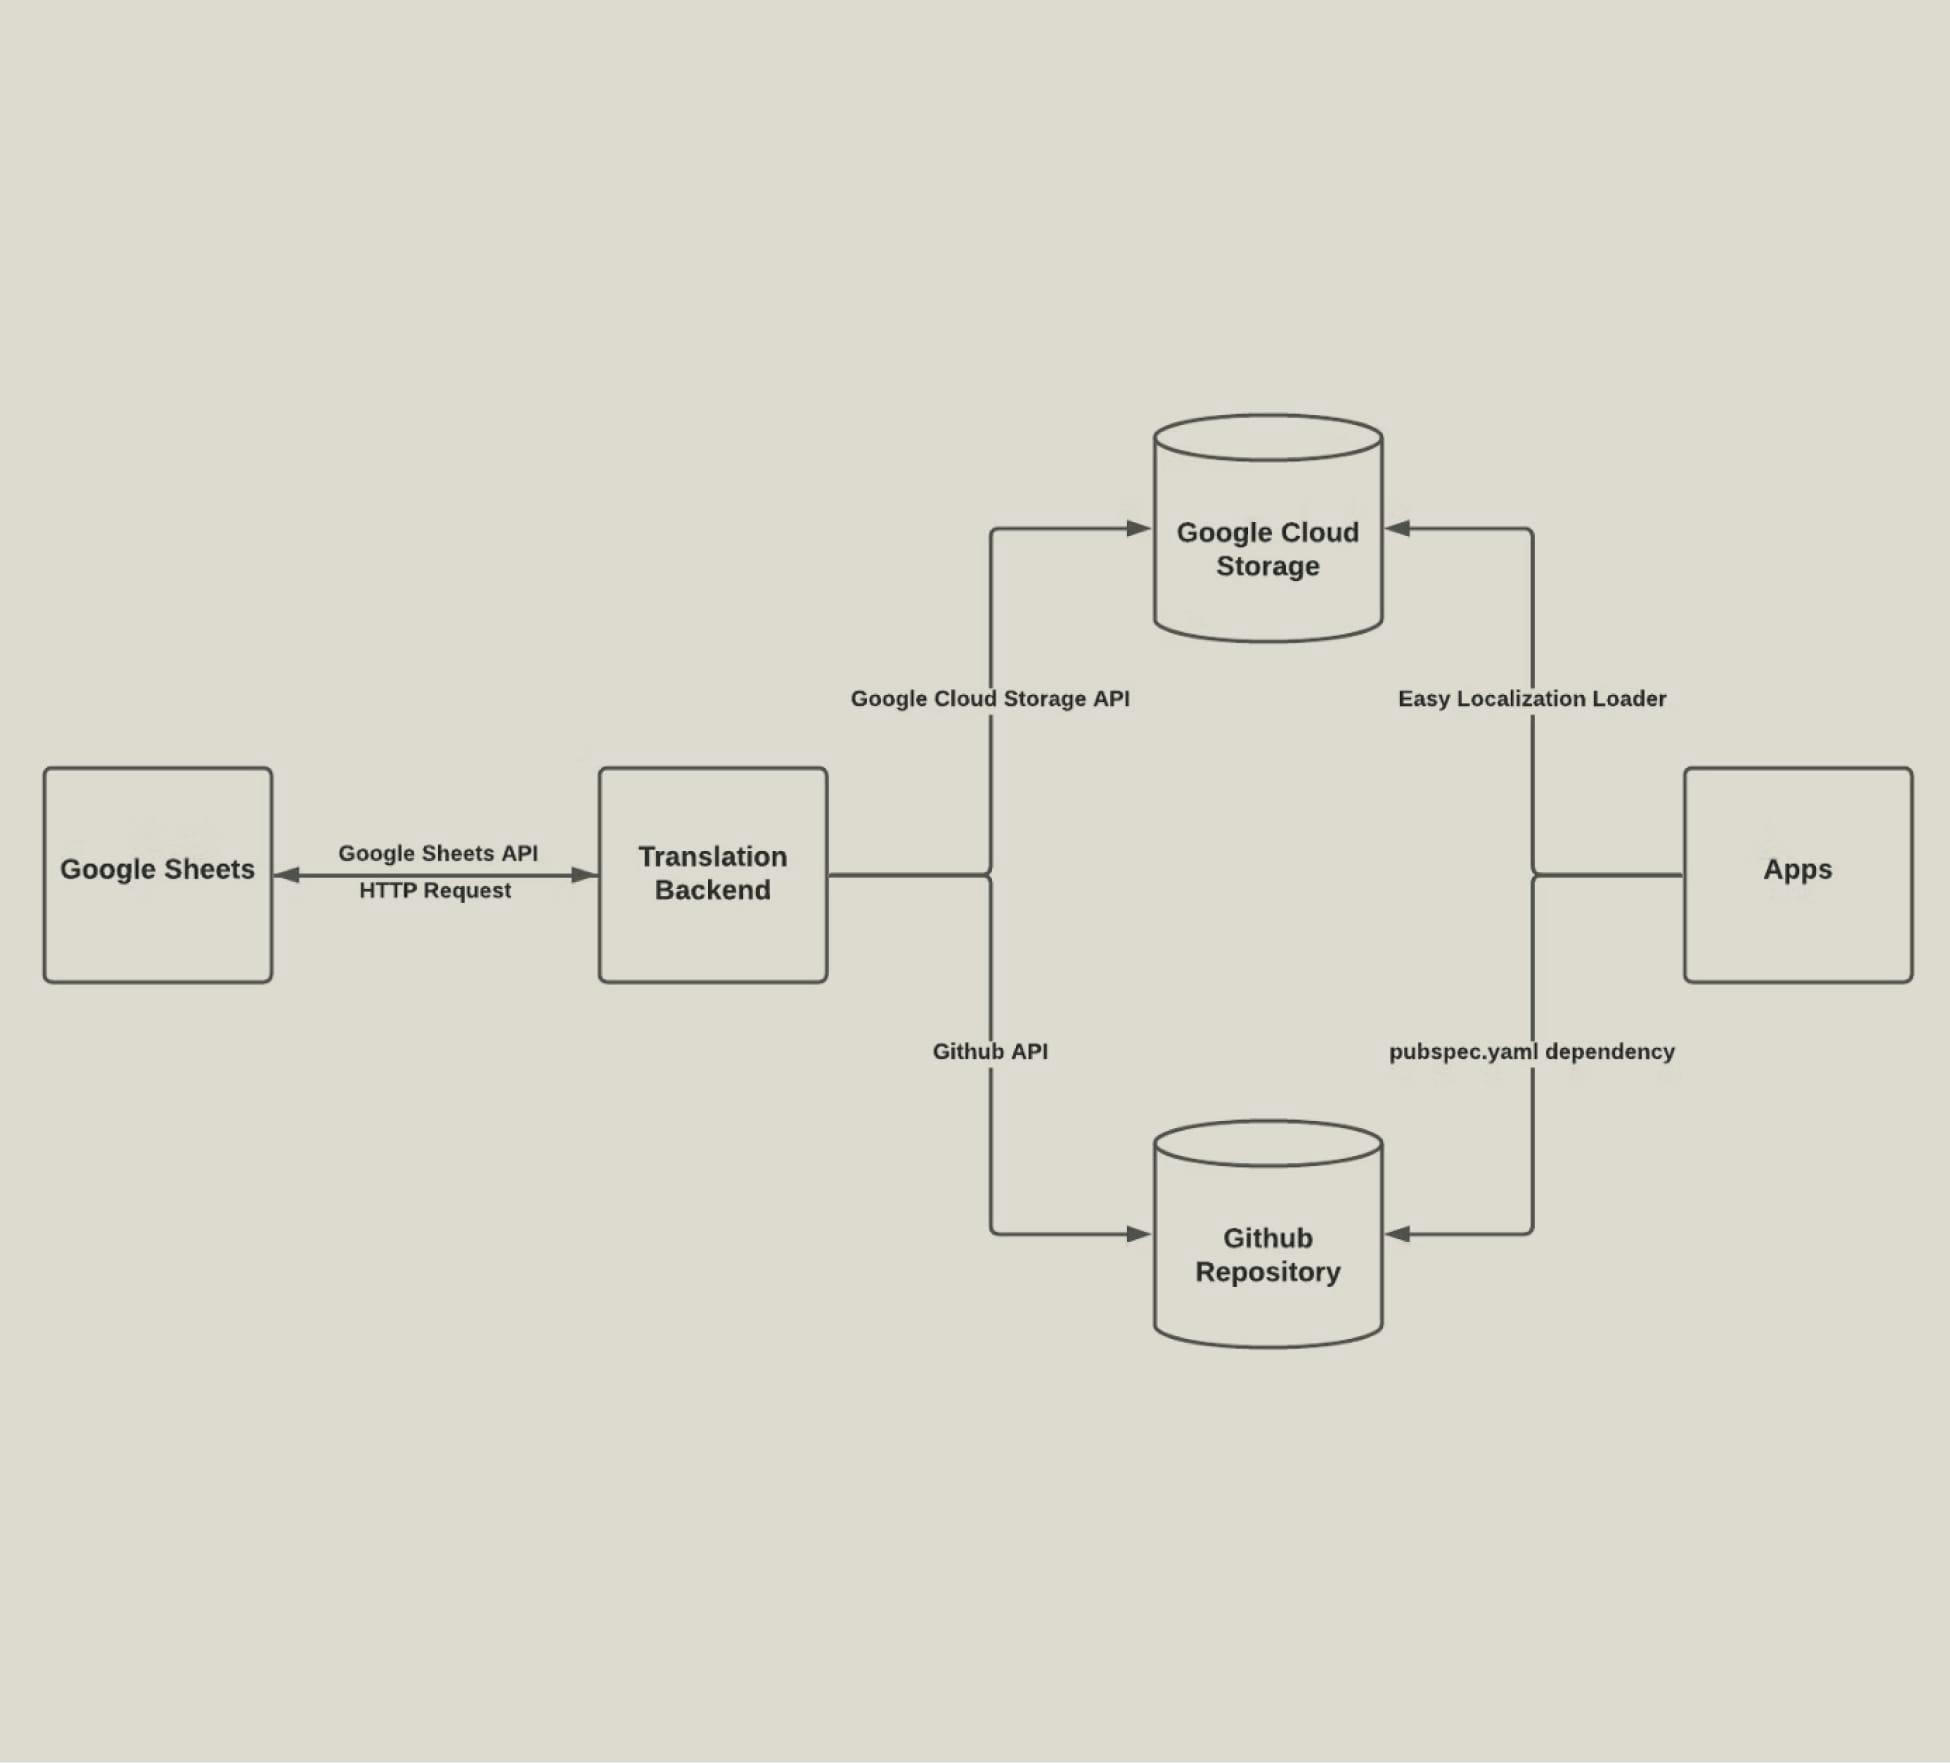
Let’s imagine an alternate scenario where your translations can be easily edited and an error like the one described above cannot occur. In addition to your localization setup being fault tolerant, you also have an easy-to-use interface for translating text that not only developers can utilize and manage but also non-technical team members. Fortunately, the picture that I am painting can be achieved by utilizing the architecture shown below, which I will describe in detail:

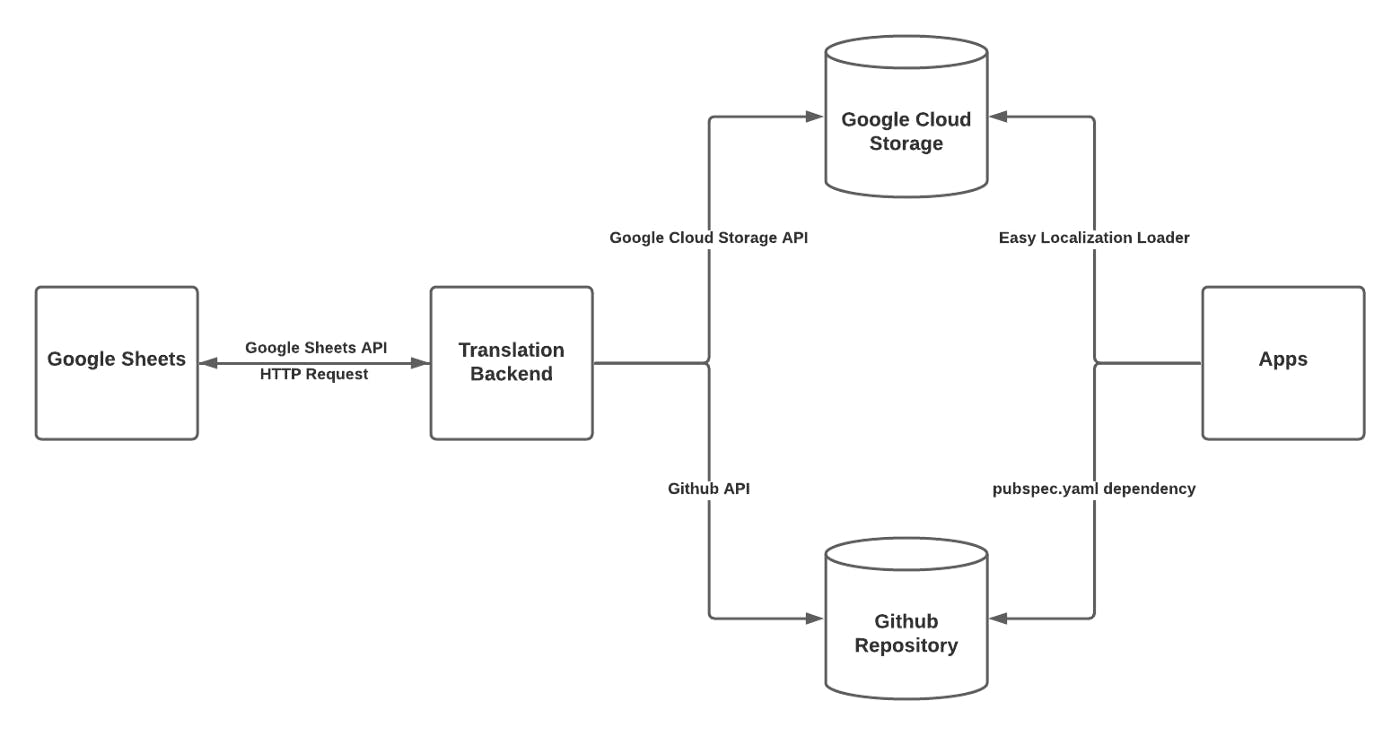
Firstly, I propose that you store your translations on a Google sheets, which provides an easy to use interface to add or modify translations. You can simply have each column represent a locale and use the GOOGLETRANSLATE function to obtain some initial translations, translated from English to any locale of your choosing. Additionally, you can share this with any member of your team and even restrict access to certain columns. Now, you might be wondering how could you transfer the translations from Google Sheets to the JSON file that I described earlier. Well, there are many ways to do this… My approach was to implement a Google App script that notifies a web sever (aka the backend) via a HTTP request to get the translations and store them in a public directory on Google Cloud Storage. The code for the script can be found below:
// onOpen is triggered when the google sheets is initially opened
// and creates a new menu containing the save translations function.
function onOpen() {
   var ui = SpreadsheetApp.getUi();
   ui.createMenu(‘Scripts’)
   .addItem(‘Save Translations’,’saveTranslations’)
   .addToUi();
}// Notify the translation backend to save the new translations from
// this google sheets.
function saveTranslations() {
   options = {muteHttpExceptions: true};
   var response = UrlFetchApp.fetch(<backend endpoint url>,
   options);
   if (response.getResponseCode() != 200) {
      SpreadsheetApp.getUi().alert(response.getContentText());
   }
}
The onOpen function in the script is triggered every time the Google Sheets is opened. It creates a UI menu named “Scripts,” which contains a button called “Save Translations.” When this button is pressed, it calls the saveTranslations function which as described above, makes a HTTP request to an endpoint on the backend hosted on Google Cloud. I utilized both Python and Flask for the backend, since Python supports simple clients for interacting with different Google services. Some of the libraries that I used were the following:
In addition to installing these libraries, I also needed to add the Google Drive and Google Sheets APIs to my Google Cloud account and download the necessary credentials. There are many tutorials online that explain how to do this, and since this blog post is more focused on the bigger picture and the backend does not need to be implemented in Python, I will avoid discussing any details about my Python implementation. In addition to utilizing these libraries, I recommend runtime adding checks to see if there are duplicate translation keys or if any of the keys have been modified or deleted since you last released translations. You can easily do this by pulling the old translations from Google Cloud Storage every time you want to update the translations.
If you have gotten this far, you now have a scalable systems for localization, but you are not done yet — there are a few other issues to address. Firstly, in order to utilize the translations on your app, you need to specify the translation keys manually, by doing something like the following:
"hello_en".tr()
The problem with this is that as a developer, you are not aware what translation keys exist or you might misspell a translation key. Consequently, you will end up in that same undesired situation where your users see “hello-en” instead of “Good Morning!” To solve this, you could have a separate file in your app directory where you manually specify your translation keys. However, you should always automate something that is tedious and can be automated — and this problem fits that definition.
The approach that I followed was to create a separate package hosted on a different Github repository than my app, which would contain the translation keys. This package should have its own pubspec.yaml file and its own lib directory. After doing this, you can import the package as a dependency via the app’s pubspec.yaml file:
translations
   git:
      url: [link to Github repository]
To import a private repository, you will need to utilize a Github authorization key in the link. You might be thinking that updating this package requires the same amount of effort as updating a local file in the app directory. Well, the answer is no if you get your backend to update the translation keys by committing changes to the repository whenever you update the translations. To do this, I utilized the following library to authenticate a Github account and commit changes to the repository:
Problem solved… Now to move onto the final problem that I needed to address: how to show translations when the app has poor connectivity and cannot retrieve them from the cloud storage provider. Simple… Add an assets folder to the same package you are storing the translation keys; and in that folder, store the same JSON file that you uploaded to Google Cloud Storage. By doing this, the app will also pull the translation file in addition to the translation keys when it is initially compiled. In the app, whenever EasyLocalization is not able to retrieve the translations over the network, you can simply load the local translations with the TestAssetLoader. Before running the app, you can test the network connection by wrapping the following statement in a try and catch, and then changing the paths and loaders accordingly:
await HttpAssetLoader().load(translationsPath, Locale(‘en’));
After following this post until now, you should have a scalable, fault tolerant, and user friendly localization architecture for your mobile apps. You can apply this approach to other mobile frameworks besides Flutter by just using a different package in place of easy_localization. I hope you found this helpful and thanks for giving this a read!